Work Instruction
A workflow is used to enforce a set of required approvals before certain actions can be completed in Mar-Kov. To implement the Workflow feature, an approval code detailing the approvals required must first be created.
Approval Update
The Approval Update program is accessed from the main menu, by clicking Administration >> Approval Update.
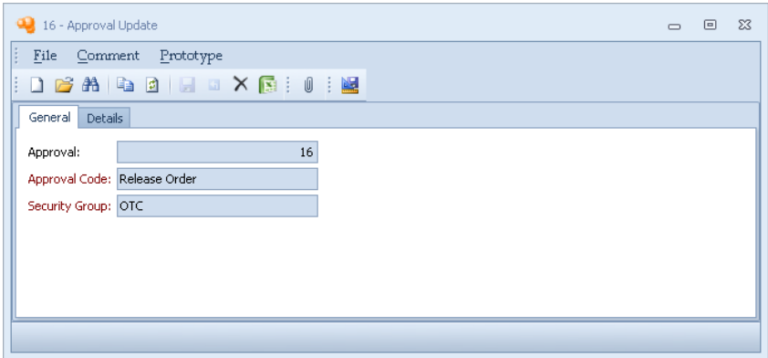
Approvals are used when you require users to confirm that an action may be taken; there are five possible Approval Codes:

The Security Group allows you to select which type of order or recipe the Approval applies to; for instance, you may require orders that use controlled substances to have more stringent approval procedures.
Approval Details
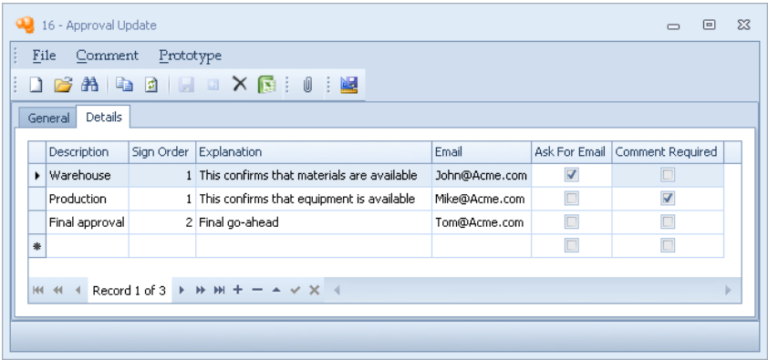
Each detail line specifies a separate signature that must be entered before CMS will allow you to perform the action being approved.
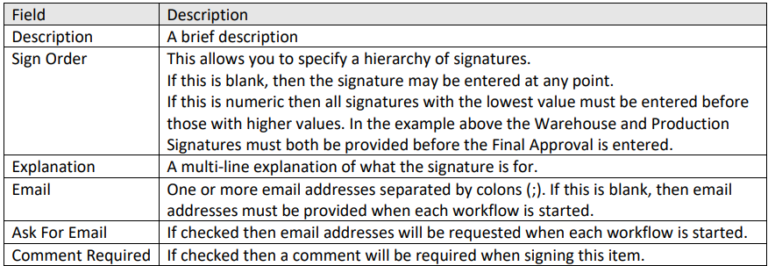
A workflow can now be enacted.
Workflow Processing
To start a workflow click on the ‘Start Workflow’ button, the Start Workflow form appears:
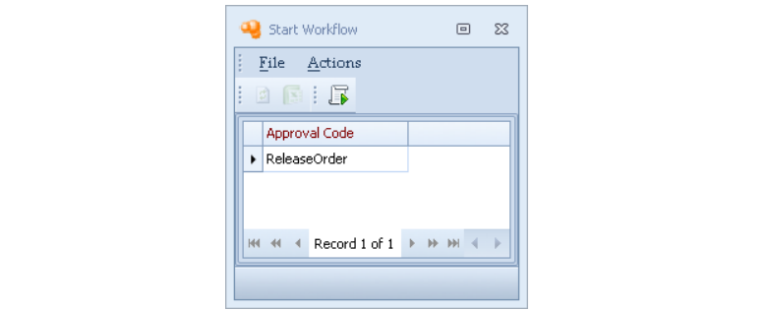
If there are multiple Approval Codes shown, then select the one you want to start. Click on the Start Workflow button, if any Approval Details do not have Email specified or have Ask For Email checked then you are required to enter emails for each of those details:

Email shows the address from the Approval Detail; each of the four email field may be edited – only email addresses from the User Update for users allowed to sign for this item may be selected.
When you click OK on the Workflow Emails form, or if it was not displayed then the Workflow is created and a Workflow Started notification is sent for all Approval Details with a blank Sign Order or with the lowest Sign Order.
Workflow Status
To view the status of a workflow click on the Workflow Status button, the Workflow Status form appears:
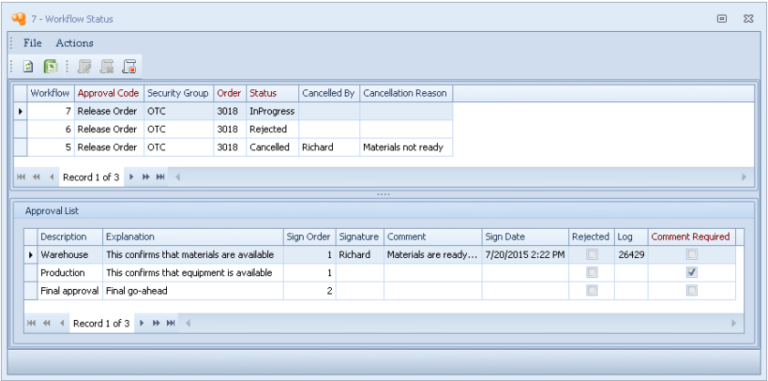
The upper grid shows the current workflow status; in the example above the work flow was started and cancelled then started and rejected and has now been started for a third time.
The lower grid shows the status of each workflow detail; in the example above the first detail has been signed.
Sign Workflow
To sign for a workflow detail select the line in the lower grid and click the Sign Workflow button, the Sign Workflow form appears:

You are only allowed to sign for details that are allowed by your Role.
Enter your User and Password. The User must be that one that you used to log into your current Windows session. The Reason is required if the detail has Comment Required checked. Click OK to save the signature.
If the detail being signed has a Sign Order and there are now no other details with the same Sign Order then a Workflow Started notification is sent for all Approval Details with the next highest Sign Order. If there are now no other unsigned details then a Workflow Completed notification is sent.
Cancel Workflow
To cancel a workflow click on the Cancel Workflow button, you are asked to confirm:

Enter your User and Password. The Reason is required and you must check the Confirm Cancel box.
Click OK to cancel the workflow, a Workflow Cancelled notification is sent.
No further actions can be made to this workflow; a new workflow may be started by using the Start Workflow button.
Reject Workflow
To reject a workflow, select an unsigned detail and click on the Reject Workflow button, the Reject Workflow form appears:

Enter your User and Password. The Reason is required and you must check the Confirm Reject box.
Click OK to reject the detail, a Workflow Rejected notification is sent.
No further actions can be made to this workflow; a new workflow may be started by using the Start Workflow button.
